How To Get Different Textures With Oil Paint
- Nic Thurman
- Apr 12, 2023
- 18 min read

Updated: Apr 28, 2023
Oil paint is a versatile medium that allows for a variety of different textures and effects. From smooth and glossy to rough impasto, the possibilities are endless. We will explore different tools, techniques and tips to achieve different textures with oil paint.
1. Choice of Canvas
Considering the material you work with is extremely important because it is the very foundation of your painting. Using a cotton based canvas versus a linen based canvas can produce drastically different results, which is why it is the first consideration you need to make in regards to the oil painting you want to create.
Cotton
Cotton is a natural fiber that is widely available, making it an easily affordable option. It has a smooth surface that is easy to paint on, and it's a great choice for beginners or hobbyists who prefer a flat surface. However, cotton canvas has some downsides. It tends to sag or stretch over time, especially when exposed to humidity, which can affect the stability of your painting. Additionally, cotton canvas is not as durable as linen, meaning that it may not hold up as well over time. Ultimately cotton canvas is not ideal for classical painters who want to achieve a wide variety of textural effects.

Cotton is very soft which is why cotton canvas is loose and stretchy.
Linen
Linen canvas, on the other hand, is considered the top-of-the-line option for oil painters. Linen is a natural fiber made from flax, and it has a more textured surface than cotton canvas. This texture can give your paintings more depth and unique effects that are impossible to achieve with cotton canvas, and it also provides more tooth, which means that the paint will adhere better to the surface.

Flax is much stronger than cotton which is why linen canvas is more durable and doesn't sag as much after being stretched.
One of the biggest advantages of linen canvas is its durability. Linen fibers are stronger than cotton, so the canvas is less likely to stretch or sag over time. This means that your painting will maintain its stability and structure, which is especially important for larger and heavier paintings. Additionally, linen canvas is more resistant to decay and damage, which means that it will last longer and maintain its quality better in the long run. It can hold up against more rough types of mark making such as sanding and palette knife painting, which is ideal for creating a variety of texture in your oil paintings.

Glued Linen Closeup - Notice the texture and rough tooth
Another advantage of linen canvas is that it is more versatile than cotton canvas. Because linen has a rougher texture, it can be used to create a wider range of effects and styles. For example, you can use the actual tooth and weave of the canvas as a part of your textural effect in your painting.
Linen Vs. Cotton Canvas in Conclusion
In conclusion, while cotton canvas can be a good option for beginners or for those on a tight budget, linen canvas is the better choice for serious oil painters. Its superior durability and versatility, combined with its ability to create a more textured surface, make it the ideal canvas for creating high-quality, long-lasting paintings.

Cotton Vs. Linen Closeup
If you are making a simple study or a painting that you don’t intend to turn into a finished work, then it might be worth the cost difference to use cotton. For professional work and a more reliable, durable, and long lasting surface then you ought to choose linen.
2. Choice of Preparation
Equally important to your surface is the type of preparation that is used on the surface. There are many different types of preparation which can alter the texture of your surface, and ultimately the textures that you will be able to achieve in your painting. Additionally, it is important to consider the type of preparation that you are using for the sake of longevity.
Raw Canvas
Unprimed raw canvas is simply canvas that has not been coated with any primer or sizing. While it's the most affordable option, unprimed canvas is not suitable for oil painting since oil paints will eventually deteriorate the canvas fibers. However, it can be used for other mediums such as acrylics, watercolors, and even drawing. This type of canvas may be suitable for building texture in acrylics but for oil painting it is just not an option.
Gesso
Gesso-primed canvas is a very popular choice, mainly because of its accessibility. Gesso is a type of primer made from a mixture of glue and chalk, and it can be applied to canvas, paper, or wood. Gesso can be used with a variety of mediums, including acrylics and oils. Gesso-primed canvas can offer a slightly textured or extremely smooth surface depending on how it's applied. However, it is not as durable as oil-primed canvas and is a relatively modern method for preparing canvas. Again this is a feasible budget option for preparing canvas but not a serious solution for classical oil painters making paintings that should stand the test of time. The main problem is simply that gesso has not been used for a long enough period of time to truly understand how it will behave in the long term. While many alleged experts claim that this is an ideal surface to work on, there are other preparations that have been tested for a far longer period of time (dating back to the renaissance or earlier) that provide a more certain result. The simple truth is that gesso is a relatively modern preparation with no long term evidence to support that it is archival.
Glue Sized Linen
The glue sizing process involves applying a thin layer of animal skin glue or synthetic glue to the surface of the linen. The glue is heated and mixed with water to create a liquid solution that is applied to the canvas with a brush. The glue seeps into the fibers of the linen, sealing them and creating a more stable surface that is less likely to stretch or warp. Glue sizing has been used for centuries as a traditional method for preparing linen canvas for painting. Glue sizing helps to seal the fibers of the linen, creating a more stable surface that is less likely to deteriorate over time. Notably, Titian used this surface to make numerous paintings that are still in good condition to this day.
This can be a great option if you are looking to incorporate the heavy weave of the linen into the texture of your painting. The texture is the main appeal of working on such a surface, and it offers many unique benefits. One such effect is that the weave of the linen can make your painting appear more soft due to its grid like structure or weave. Additionally, as previously mentioned, the linen surface is much more durable as opposed to cotton, which means that it will be able to handle far more rough and aggressive oil painting techniques.
Oil Ground Prepared Linen
Oil ground preparation is a simple mixture that has been used for centuries by masters like Caravaggio, Rembrandt, and today by Odd Nerdrum. It consists of a mixture of chalk, oil, and oil colors. The oil ground is thinly scraped over the top of glue sized linen with a large palette knife, which gives it a smooth finish. The slick and smooth surface makes starting a painting quick and easy. Your brush will glide across the canvas. This means you can cover area more quickly without the canvas ‘absorbing’ your color. The ground is colored to make achieving life-like results easier than any other method. Using a fleshy mid tone means that most of the surface area is already covered for you, so you can immediately begin to fill in the shadows and highlights.
Mixing Oil Ground Preparation Via @kitschmeister and @nic.thurman on Instagram
The oil ground serves as a protective layer between your paint and the sized canvas. It adds additional weight and flexibility, meaning the canvas is far more durable. The additional protection also means that you can scrape into the surface and create more layers & transparency without needing to worry about damaging the canvas. This is crucial if you plan to scrape down in between layers like the old masters did. Having this base mid tone also means you can use more transparent effects. You can intentionally leave transparency in your paint knowing that the fleshy mid tone will support you on the base level. Having the color on the canvas from the beginning will also set the mood of your painting and will create relative contrast.
Oil ground prepared linen is more expensive than other types of canvas, but it is by far the best if you want to make long lasting professional paintings, and to work in the ways of the old masters. There is no better surface for achieving a variety of textures, as it offers the smoothness of more common surfaces, unparalleled slickness, and still maintains the roughness and tooth of a heavy glued linen.
Canvas Preparations in Conclusion
There are a variety of options when it comes to the type of canvas and preparation available to use. If you are looking for the most cheap and readily available option, then there are many stores that sell gesso prepared cotton canvas. It is easily the most popular option today. However, you get what you pay for, and in this case that means the canvas is really not made to stand the test of time. If you're a hobbyist or just beginning to paint it is still probably the best option for you because it is so cheap and easy to find.
If you are working with acrylics, watercolors, or drawing materials and want to achieve more texture, then a raw unprimed canvas might be the right option for you.
If you want to paint like the old masters and make paintings that will last for as long as possible, then oil ground prepared linen is the best option. This will hold up the best to a variety of techniques and extreme weight. Not to mention it is what the greatest masters of history have used!
3. Choice of Brushes
The brushes that you choose will have an important impact on the types of textures that you're able to create. Different brushes have an inherently different textural quality, so be sure to choose the type of brushes that are suitable for the texture you want to create.
Type of bristle
One consideration in that regard is the type of brush bristle that you use. Today there are many different types of brush hair options which will ultimately impact the way that your paint is applied and its textural appearance.
One major difference can be noted between natural and synthetic brushes. Synthetic brushes generally do not hold as much paint because they lack the absorbency of natural bristles. This means that they will not be as good at creating certain textural effects, especially those that require long fluid marks for example.
Hog hair bristle brushes are a time honored brush that offers a combination of strength, randomness, and smoothness. This is a great natural brush option that has extreme versatility and durability.
Why I Love Hog Hair Bristle Brushes via @nic.thurman on Instagram
There are many other types of natural bristle brushes that also offer different textures. Some other popular options include ox hair, pony hair, squirrel and many more. These will all offer varying degrees of softness and rigidness but are all generally better at holding a full load of paint than their synthetic counterparts, which is why natural bristles offer more textural versatility in oil painting.
For oil painting in the style of the old masters, I recommend hog hair bristle brushes because they offer the best types of mark making and great durability. For other goals, research to find the right type of brush for you.
Shape and Style
The shape and style of your brush is also extremely important for creating particular textures. Differently shaped brushes will be ideal for achieving different shapes and effects in your painting.
Filberts are arguably the most versatile and natural brush to use because of their unique shape. They are long with a semi rounded tip. This allows for brush marks to be made fluidly. Additionally these brushes are able to hold a lot of paint which makes them ideal for long fluid marks. The shape can be used to make bold direct marks or soft rounded ones. It can also be turned sideways for sharp clear marks.
Why Filberts Are My Favorite Type of Brush via @nic.thurman on instagram
A fan brush is great for creating wavy sporadic lines. It can also be used in its thin direction to create sharp clear lines. Finally it is useful for dry brushing and blending because it can cover a wide area with supreme softness.

da Vinci Forte fan brush
Chip or flat brushes are useful for creating bold and direct marks. They are uniquely squared which makes them ideal for creating geometric shapes and blocky or heavy marks. These are great for starting a painting as the broadness is suitable for covering a large amount of area at once. They can also be great for creating rough and loose textures. The sharp edges of the blocky shaped bristles also act as a bonus tool because they can be used to make straight, sharp, and clear lines.

da Vinci hog hair mottler brush - These brushes also come in a variety of sizes which can be extremely useful when beginning a painting. You can start with your biggest flat brushes and then progressively use smaller size flat brushes. This serves as a great way to force yourself to get the solid blocky structures in place first before getting into the smaller details.
4. Painting Thin
To achieve a smooth and uniform surface, apply thin layers of oil paint with a brush and pay attention to your marks. Use a small amount of paint and look at the reflection on the surface to judge if your paint is thin enough. Painting in the same direction as the light that is coming on to the surface will also help to minimize the visibility of your brushstrokes. If done properly, your thinnest paint should not reflect any light. For an extra smooth finish consider using a solvent or oil medium to make your paint even more slick.
How Brushstroke Direction Changes Reflected Light in Oil Painting via @nic.thurman on Instagram
Between layers you can also sand using 120 grit sandpaper, or scrape down using a palette knife to remove even more paint and get a thinner finish.
Sandpaper Demonstration via @nic.thurman on Instagram
A great technique for achieving a thin glossy finish is glazing, and involves applying transparent or semi-transparent layers of paint on top of each other. The layers of paint blend together, creating a smooth surface with increasing depth and luminosity as the layers build up. This is useful in areas that you want to maintain an extra smooth finish while still creating depth and glow.
Old Master Secrets for Transparency Via Nic Thurman on YouTube
If you want to achieve a variety of textures and the most depth possible in your painting, then you should use these thin effects in combination with thicker impasto effects. The contrast between the two will create a greater sense of depth than just thin or thick effects used independently.
One way to achieve better depth in that regard, is to treat the painting like a 3 dimensional sculpture. In the shadows or receding areas you should use the thinnest amounts of paint and scrape or sand the most.
5. Painting Thick AKA Impasto
Impasto is a technique that involves building thick layers of oil paint. The resulting surface has visible brushstrokes and a three-dimensional quality. Impasto is great for creating texture and adding emphasis to particular areas of the painting.
To produce the most depth in your painting you should use impasto in areas that are protruding or receiving the most light. Contrast these thick areas of paint with thinner areas of paint to add an enhanced sense of 3-dimensionality and glow.
Old Master Secrets - Impasto via Nic Thurman on Youtube
Another great way to use impasto to create texture, is to imitate the surface of your subject. When painting fur for example, you should use thick paint and allow the brush to leave marks in the impasto that reflect light in the same way as the fur does.
Idiota by Odd Nerdrum - Notice how the fur is painted with a variety of textures and techniques. In the area that appears the most fuzzy he has used the most impasto and created a natural pattern by applying the brushstrokes in particular directions. The smoother areas are painted more thin and transparently.
Another way to think about this is when painting various rocks. Some are very smooth and should thus call for a smoother building of impasto.

Inger On The Beach by Edvard Munch - Notice how the variety of impasto and mark making corresponds with the texture of the rocks. The parts that stand out the most are painted with the most impasto, while the softer smoother rocks are painted more thinly and with less apparent marks.
A more rough rock however may have a plethora of tiny cracks, crevices, and holes. Which would require an extremely thick and random application of impasto so that even the shadows on the rock appear to have a rough and random texture.

Man With a Woman's Head by Nic Thurman - Notice the rough and random texture in the foreground. This impasto was created by using a combination of brush, palette knife, wet and dry paint, and even hard crusty paint scraped off of the palette that had essentially began to turn into a rock.
Knowing when to create or avoid reflective light is extremely important for creating a sense of texture. This also applies to a variety of different surfaces. Even very similar fabrics might require a very different approach when painting them. One very obvious example of this can be found in shiny fabrics. For example, silk and cotton might feel quite similar, but they could require completely different approaches to be painted believably.

Painting by John Singer Sargent - There is a variety of different textures here which require a variety of treatments. Notice how smooth the floor and woman's face are. That is heavily contrasted by the direct mark making of the dress and clothing. Also look at the differences of the couch, the wall, and the table.
There's still more consideration that needs to be made when using impasto. Not only do you need to think about what the surface looks like in reality, but also what you want the viewer to see, what the story is about, and how you will develop a focus. All of these factors will impact the texture that you should be using and how to balance impasto with smooth painting and other effects.
While a realistic approach is quite satisfying, it can be improved even further when you add poeticism to it. One way to think about this is that you can add even more volume, focus, or importance to an object by giving it more depth - AKA contrast between impasto and thin painting.

The Golden Cape by Odd Nerdrum - Here you can see that there is a strong focus of light and a large variety of texture that doesn't correspond as directly with the individual objects as was in the Sargent painting. Instead the texture is used in a more interesting way. It is used to move the viewer's eyes through the painting with intention. While we understand the textures and what different objects exist in the painting, we also can't resist looking where Nerdrum has directed us.
Be sure to consider how to use the contrast between impasto and transparency in order to enhance these qualities in your own paintings.
6. Sgraffito
Sgraffito is a technique that involves scratching through a layer of paint to reveal the layer that is underneath. This technique can be used in an infinite amount of ways to create interesting textures and patterns. To achieve this effect, use a pointed tool such as your palette knife, or even the back of your brush, to scratch through the most superficial paint and reveal what is underneath it.

Rembrandt Self Portrait Closeup - Notice the scraping marks, all around the eye on the light side, where you can tell that Rembrandt has used a palette knife to scratch into the surface.
This is a highly effective way to add a large amount of texture with a small amount of effort. Sgraffito can also be used with varying degrees of impasto to create multiple layers of effects simultaneously.
Some surfaces where sgraffito can be useful:
Hair, mustaches, fur, grass etc. Sgraffito can create the same feeling as individual hairs and natural variety without all the effort of painting it literally. Painting a field of grass one blade at a time would take way too long! But if you layer intentionally, using the main colors that make up that field, you will be able to quickly cover a large area in a convincing way.
Rocks or rough objects. It can be used to create small rough surfaces such as the cracks or holes on a rock or the grain of wood.
Skin, fabrics, smooth surfaces. Sgraffito can be used to make skin feel more alive by adding a more complex or broken color pattern. For example, you can have a warmer pinkish color as a base, then add a cooler gray color on top, and scrape through the gray to reveal the pink. This can serve as an interesting way to create texture and shade an area without painting directly.
7. Scumbling
Scumbling is a technique that involves applying a thin layer of opaque paint over a dry or semi-dry layer of paint. The top layer is applied with a dry brush, creating a translucent effect. Scumbling can also be used to create a misty or hazy effect in the painting.
This is useful when painting mid tones that don’t need extremely varied texture. Additionally scumbling can be used as a means to create sfumato, a smoky or hazy effect. You can use a dry brush with white for example and scumble directly over edges to make it feel as though a haze is blurring everything.

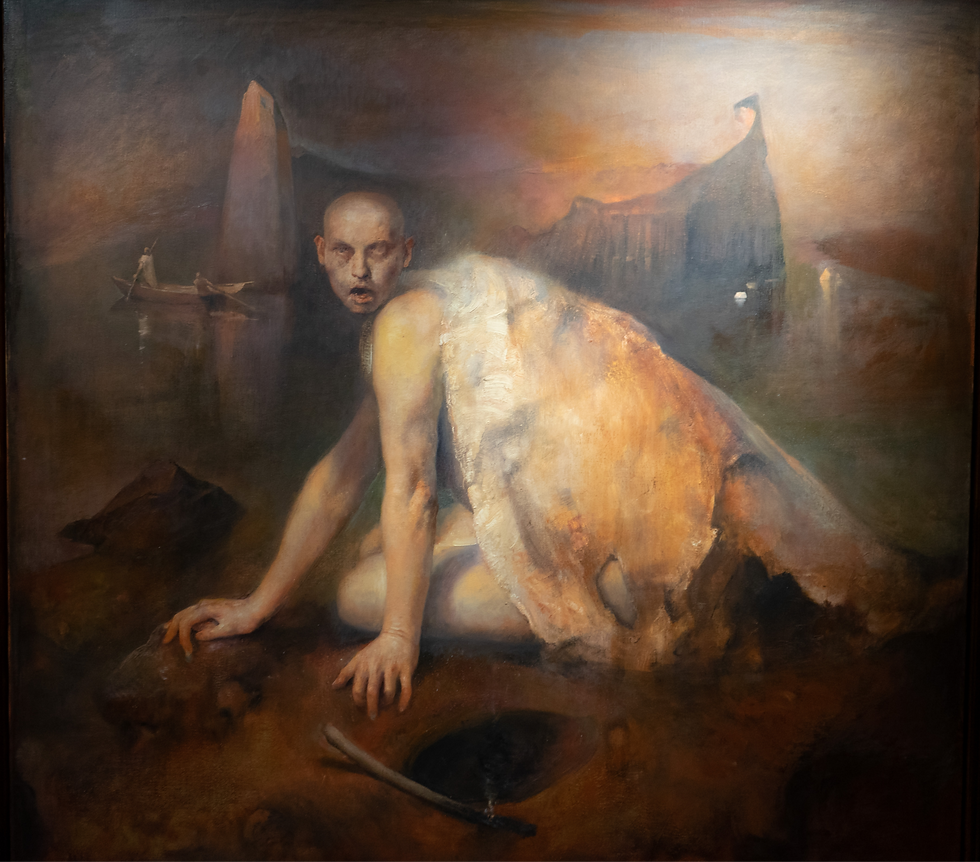
Aurora by Odd Nerdrum - Scumbling would be useful in many of the areas where there are delicate transitions in this painting. For example, the shift into cooler lights going from the man's chest down to his belly, the man's arm, and the woman's arm.
Scumbling is useful for a wide variety of textures when oil painting. It is generally best for opaque areas of the painting where you don't want to create reflective light or leave behind apparent brush marks.
8. Wet-on-wet
Wet-on-wet is a technique that involves applying wet paint on top of wet paint. This technique is great for blending colors and creating soft edges. Wet-on-wet can also create interesting textures and patterns as the colors mix and blend together. If used properly the wet on wet technique will lead to a slick and wet finish making it especially useful for skin colors, wet surfaces, or smooth textures. This is not limited to smooth painting though! It can also be used with bold impasto, but you must be careful depending on the thickness of the paint because building thickly on a wet surface can take too long to dry and cause structural issues.

Rebecca by Nic Thurman - In this painting the final layers were made using a wet on wet technique which helped to create a soft blending between the under-layers and the final top layers. This applies to the light skin colors and the shadows all around. The wet on wet technique was crucial for creating the sense of atmosphere and smooth blending between different surfaces.
One of the greatest advantages of the wet on wet technique is the fact that it can conceal brushwork and create mysteriously soft edges and transitions.
9. Dry Brushing
Dry brush is a technique that involves using a completely dry brush with a small amount of paint to add color to the surface. This technique can create rough and scratchy textures or soft blending on the surface of the painting that is similar to local glazing.
One way that dry brushing can add increased depth is by applying warm or cool colors to particular areas to give them a temperature shift. In the cheeks or nose for example, you could use dry brushing in order to add a bit more pink or red for the added sense of warmth. You could also dry brush using a thicker amount of paint and a rougher brush to achieve more rough effects. This could offer highly detailed roughness that might be useful when painting fur for example.

Rembrandt Self Portrait - It seems quite apparent that Rembrandt used dry brushing in a large number of his paintings in order to increase the sense of depth and luminosity. Particularly when it comes to red or pink accents in the nose, cheeks, and lips.

The Jewish Bride by Rembrandt - There are some accents on the cheeks and nose of the figures, especially the woman, that seem to have been created by dry brushing.
One advantage of dry brushing is that it can add a sense of liveliness because the color being added can be high in saturation but applied delicately so as to appear transparent. As with many effects, this transparency is useful because it creates an added sense of depth.
Dry brushing is also useful for various textures or surfaces that need a soft glow of color. For example, moss, water, rocks, or the sky may all be places where dry brushing could be useful for achieving more life like results.
Palette Knife Painting
A palette knife is a quite blunt object which is why it serves well for creating rough and broad textures. The sharp edge of the palette knife can create clean and sharp lines, while the flat broad edge can be used to create thick and textured surfaces. You can also use your palette knife for scratching to create details, or scraping to soften your painting.
For making an area really stand out with thick impasto, you can use the palette knife to pick up a large amount of paint and apply it roughly. You can also create smooth impasto using a palette knife by smoothing out the paint like icing on a cake. This serves as a uniquely useful effect when creating blunt or rigid objects. Be cautious if you use this effect in areas like the face or for soft surfaces because the impasto can become very strongly adhered to the surface making it nearly impossible to remove, ultimately creating a permanent rough texture.

The Jewish Bride by Rembrandt - Here it seems that Rembrandt has used the palette knife to create thick highly textured impasto with some randomness as well as more clear and sharp lines in the clothing.
Conclusion
When choosing the right technique for your painting, consider the subject and what you want to achieve with the painting. Try to envision the texture of the surface and how you can reflect that using the appropriate effects.
Remember, there is more to painting than just photorealism. Consider how you can elevate your subject by using a variation of textural effects to achieve results that are even better or more gripping than the real thing. Experiment with different techniques to find the ones that work best for you and your subject.
Want To Learn More About Classical Oil Painting Techniques?
Are you passionate about classical oil painting and want to take your skills to the next level? Join our Patreon community at patreon.com/nicthurman to learn more in depth about classical oil painting techniques and the craft of oil painting. With exclusive access to in-depth tutorials, painting philosophy, and personalized feedback, you'll be able to develop your skills and create more lifelike paintings. Don't miss out on this opportunity to master the craft. Join us on Patreon today!

Comments